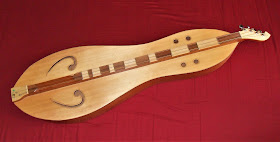
My newest luthiery project is to build a tres cubano. As the name implies they are traditional Cuban instruments and have three double-course strings (six strings all together) tuned G-C-E. I plan to show the whole building process starting with sketching out a design and drawing up the full-scale plans.
Tres' construction is similar to a classical guitar and they typically have a very deep cutaway. In an unusual twist, I went with a circular soundhole rather than my favored oval.
My friend I'm building this for sent me this picture of an iron grate as a rosette idea. These are apparently all around Havana.
From my plans I made a body template where I sketched out the rosette. The first part I made was the bridge since I had a piece of rosewood handy and I still hadn't decided on what woods to use for the body.
Here is the bridge next to a standard 6-string bridge of a Fender acoustic. That guitar was from the shop I used to work at. It was replaced under warranty by Fender. When Fender replaces a guitar they demand proof of destruction of the old one. We had to send them a video of the guitar being cut into pieces. This is a completely horrible greed-fueled proprietary policy meant to prevent resale of an "authentic Fender".
Rather than letting the whole thing end up in a landfill as Fender would have it, I choose to salvage as much as I can for my own builds. For the tres I am using the neck, the neck block, and the fingerboard. I might also use the truss rod but it would need to be cut shorter and re-welded. The string scale on a tres is shorter than a standard guitar scale, so
I'm going to need to cut the neck shorter and splice on a new headstock
made from that big mahogany board.
I cut the fingerboard at the first fret, making the scale length 24 1/8".
I'll need to fill in the inlay dots and make new inlays in the correct fret positions.
The head is glued onto the neck at an angle. This is called a scarf joint. The joint on this neck is right at the bottom edge of the angle gauge. The new joint will be at the line I drew about an inch back along the top edge.
I think we tentatively decided on this headstock design.
For the body woods I settled on maple for the back and sides and redwood for the soundboard. Above is the uncut board of redwood, below are the book-matched redwood plates, planed to rough thickness. The small board in the picture above is eucalyptus which I had been considering for using for the back and sides.
The body of the tres is wider than the plates, so I'll have to join extra wood at the edges.
Next I started on the braces. I mentioned in my update post how I had a lot of old piano soundboards to use for wood. I peeled off a bunch of braces, trying to find the ones with the squarest and tightest grain.
I re-sawed them all in half and cut lengths around all the dowel and screw holes. Piano braces all have dowels drilled into them to attach the bridges to the soundboard. A lot of older pianos have screws going into the braces from poor soundboard repairs.
The front and back of the tres body will have a 12' radius arch so all the braces need to get the radius cut on the gluing edge. I do this by running a pencil across the dished board I use in my go-bar deck.
Here's the radius marked on the side of a brace before getting cut.
Shout out to Knox Lumber!
Here I have all the braces laid out where they'll go. The two long braces running along each side of the soundhole are going to run all the way through underneath the center brace. The amazing flamed figure in the maple is visible in this picture, even though all the maple plates are still rough sawn. I will have to plane those down by hand to the right thickness.
Once the sides are thin enough, they get bent by hand and placed into this jig for gluing together. Before that step I will join the book-matched plates of the front and back together and glue on all the braces in the go-bar deck I mentioned before.
Hopefully all of that will be in next weeks post.


