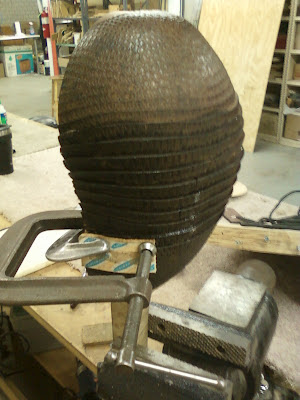
this picture was taken 4-18-08, the day i received this armadillo shell.
i completed el charango and strung it up for the first time 4-24-13, almost exactly five years from the beginning of this project to the end.
there is an undersaddle pickup with an endpin jack installed.
all the dots inlayed on the neck are bamboo.
i stamped it when i completed construction in late 2012. the finish is all shellac, which i took my time with.
i cut out and re-shaped the back of this violin case to fit the charango.
the lining is from a sweet corduroy vest i had that just didn't fit.
the build
its been on hold for a very long time but i finally got back to working on my charango.
i'm using a real armadillo shell that was found in a leather shop in
mexico by my mom. it had started to split and i had been too sketched
out about getting the shell glued to the neck/frame/lining solidly
without cracking it worse in the process. i ended up soaking then
boiling and then letting the shell dry into shape. then after a little
more fitting it was at long last time to glue it all together. heres
what the dry clamp test run looked like.
so
now its all downhill. next step is to clean up the lining frame which i
left chunky for the clamping. then i cut the soundhole and rosette and
get the top ready to go on.
the
top of the charango is made of sitka spruce. the upper bout has a
veneer inlayed as a fingerguard. i've got the soundhole cut and have
started on the rosette. it's going to be alternating white and pink
mother of pearl all the way around.
i completed the
rosette and braced the top. a
classical fan brace layout seemed logical to me to use since i've never
had a chance to look inside any other charangos.
i tend to build
instruments i've never actually seen a real physical model of a lot.
i'll go off of pictures, drawings and/or measurements. i know, i know, i
know that's definitely a habit i need to kick. i should seek out, play
and thoroughly inspect the instruments i plan to build. i have played a
couple charangos before, i've just never looked inside.
next
the lining got trimmed down from it's clamping state and notched for
the braces. here the top is ready to glue on, but first i have to deal
with some splits in the shell. here you can see a long crack going down
the center and a split between the ribs on the right. there was another
split on the left side too.
i
partially re-boiled the places that needed to get glued up to get the
leather pliable, which was actually a lot easier than i had been
worrying. the armadillo shell softens quickly in hot water but dries
very hard and brittle.
after
those repairs were done i glued on the top. i used binding tape since
there was no way to clamp to the round back. sorry but i didn't bring my
camera the day it was all taped up. to get an idea, here is a bowl back mandolin i'm restoring. i'm using binding tape to pull a split between two staves together. this also gives you a size comparison.
here
it is all put together with the finished rosette and the edge routed
for binding and purfling. most of the "routing" had to be done by hand.
i
decided against mother-of-pearl purfling and went with layered wood
like the rosette outline. the color pattern reverses where the
fingerplate inlay starts so there are four sections of purfling. i glued
each section separately.
the
outer binding is rosewood which had to be bent on the bending iron and
fit into the ledge then glued in. then i have to carve the binding flush
with the edge of the armadillo shell.
i
also decided to line the insides of the peghead with veneer, which i
bent on a soldering iron. i'm also doing some pink and white shell inlay
on the peghead face.
i
cut the pieces from shells, flatten the top and bottom surfaces on the
sanding board, then shape the inlay with dremel and needle files. but
before inlays, the fingerboard gets glued on.
rough shaping the neck with spokeshave.
one last thing to make up for not doing a mother-of-pearl edge inlay, i'm doing a carving on the heel.
rough sketch and starter lines cut into one side that i'll transfer to the other.
after
the neck is shaped and carved, i finish inlay work on the head. then
the bridge gets shaped and glued on and that's it except for shellac and
strings.
after the finish work is done i scrape off shellac from where the bride goes and glue it in place. then the pickup, strap pins and tuners get installed and i can string it up.


